Creating Form Based Authentication (FBA) Using Membership IN MOSS 2010
Creating new FBA Site in Share point 2010
Steps:
A) Setting up ASP.NET Forms Authentication User and Role Data Source


2) By default, you will see a <connectionStrings/> node within <configuration> node. Specify the connection string to the database which has been created in the previous section.


1. Configuring FBA web application web.config file
2. Configuring Central Administration web application web.config
file
3. Configuring Security Token Service web.config file
D) Adding User Policy to the FBA Web
Application


E) Verification Steps


Creating new FBA Site in Share point 2010
Steps:
A) Setting up ASP.NET Forms Authentication User and Role Data Source
·
Create Database
·
Configure Membership and Role
Provider
·
Create User
B) Create Web Application and
Site Collections
C) Configure Web.Config file
·
Configuring FBA web application web.config
file
·
Configuring Central Administration web application web.config
file
·
Configuring Security Token Service web.config file
D) Adding
User Policy to the FBA Web Application
E) Verification
Steps
A)
Setting up ASP.NET Forms Authentication User and Role Data Source
* Create database:
Create database in sql server and do the following steps to add
membership tables, functions, procedures to the database
1)Open visual studio command prompt(2010) form Visual studio 2010
->visual studio tools. It will open as follows.

2) type aspnet_regsql
in visual studio command prompt and press enter.

3)
Following screen will open in window

4)
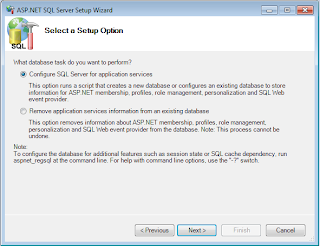
Click Next in the asp.net sql server set
up wizard, and
select
configure sql application server for service radio button and click
next.

5)
type the server name , username & password for sql server authentication , and select the database name in dropdown and click
next.

6)
Click next and Click Finish to
complete the setup wizard.

7)
Check the database that specified in above wizard for membership tables & Procedures

* Configure Membership and Role Provider
Database
is created successfully. Now we need to add a user in to database. Using
ASP.NET Configuration Wizard, users can be added the database. This can be
achieved by creating web site that will allow us to add the users and roles and
also ensure the database connection strings, membership and role providers are
correctly configured before we bring SharePoint in to equation.
Below
steps explains creating web site and configuring membership and role providers
and executing ASP.Net Configuration Wizard.
1)
Open
Visual Studio 2010 and select File -> New -> Web Site. In the New Web
Site dialog, select the ASP.Net Web Site template and enter the location to
store the web site files.

You
can choose any location whichever is comfortable for you. web.config file will
be added to project automatically.
2) By default, you will see a <connectionStrings/> node within <configuration> node. Specify the connection string to the database which has been created in the previous section.
Eg:
<add name="AspNetSqlProvider"
connectionString="Data
Source=hvdatabase;Initial Catalog=FBA_Users;Persist Security Info=True;User
ID=sa;Password=Hexacorp123;"
providerName="System.Data.SqlClient" />
</connectionStrings>
Also add the membership provider and role
provider within <system.web> tag
Eg:
<system.web>
<membership defaultProvider="AspNetSqlMembershipProvider">
<providers>
<clear />
<add name="AspNetSqlMembershipProvider" connectionStringName="AspNetSqlProvider"
applicationName="/"
type="System.Web.Security.SqlMembershipProvider, System.Web,
Version=2.0.0.0, Culture=neutral, PublicKeyToken=b03f5f7f11d50a3a" />
</providers>
</membership>
<roleManager enabled="true">
<providers>
<clear />
<add connectionStringName="AspNetSqlProvider" applicationName="/"
description="Stores and retrieves roles data from the local Microsoft SQL
Server database"
name="AspNetSqlRoleProvider" type="System.Web.Security.SqlRoleProvider,
System.Web,Version=2.0.0.0, Culture=neutral, PublicKeyToken=b03f5f7f11d50a3a" />
</providers>
</roleManager>
</system.web>
3)
Save web.config file and launch the ASP.Net
Configuration Wizard by clicking on
Website -> ASP.Net
Configuration.

Set the authentication type in the above wizard. To do this,
click Security link. In the Security tab, under Users section, click Select
authentication type link. Select From the internet option and press Done button
which is available in the bottom right corner. By selecting this option, which
means that site will use form authentication to identify users.


To test the membership
and role providers, click on Provider tab. In the Provider tab, click on Select
a different provider for each feature (advanced) link. Select right / correct
membership and role provider and click Test link to ensure that providers are
communicating to right database.

At this point, we
configured web.config file with connection string and providers information.
Also we tested the providers with the database
*
Create User
To add
users, click on Security tab. In Security tab, under Users section, click
Create user link. Here I am adding user as testFBA and password as password
which will be used for testing form authentication later.


Now we have created a user successfully
B) Steps to create web application and site collection.
Go to Central
Administration -> Application Management -> Select ‘Manage Web Application’ link present under ‘Web
Applications’ section.
Click on ‘New’ option in the ribbon.
1. See the below image for
‘Authentication’ and ‘IIS Web Site’ section.

2. See the below
image for ‘Security Configuration’ and ‘Claims Authentication Type’ section

3. See the below
image for configuring ‘Sign In Page URL’ and ‘Public URL’ section.

4. See the
below image for configuring ‘Application Pool’ and ‘Database Name and
Authentication’ section.

5. Create Site Collection
after creating web application.
C) Configure Web.Config Files
1. Configuring FBA web application web.config file
Open FBA web application web.config file and add the below
entries.
- Go to Start => Run => inetmgr.
- Go to Sites => SharePoint - site => Right
Click => Explore.
- Open the web.config file.
- Add the Following
<connectionStrings>
<add name="AspNetSqlProvider" connectionString="Data Source=hvdatabase;Initial Catalog=FBA_Users;Persist
Security Info=True;User ID=sa;Password=Hexacorp123;" providerName="System.Data.SqlClient" />
</connectionStrings>
<membership defaultProvider="i">
<providers>
<add name="i"type="Microsoft.SharePoint.Administration.Claims.SPClaimsAuthMembershipProvider,Microsoft.SharePoint, Version=14.0.0.0,Culture=neutral,PublicKeyToken=71e9bce111e9429c" />
<add name="FBAMembership" type="System.Web.Security.SqlMembershipProvider, System.Web,
Version=2.0.0.0, Culture=neutral, PublicKeyToken=b03f5f7f11d50a3a" applicationName="/" connectionStringName="AspNetSqlProvider"enablePasswordReset="false" nablePasswordRetrieval="false" passwordFormat="Clear" requiresQuestionAndAnswer="false" requiresUniqueEmail="false" />
</providers>
</membership>
<roleManager defaultProvider="c" enabled="true" cacheRolesInCookie="false">
<providers>
<add name="c" type="Microsoft.SharePoint.Administration.Claims.SPClaimsAuthRoleProvider,
Microsoft.SharePoint, Version=14.0.0.0, Culture=neutral,
PublicKeyToken=71e9bce111e9429c" />
<add name="FBARoles" type="System.Web.Security.SqlRoleProvider, System.Web, Version=2.0.0.0,
Culture=neutral, PublicKeyToken=b03f5f7f11d50a3a" applicationName="/" connectionStringName="AspNetSqlProvider" />
</providers>
</roleManager>
2. Configuring Central Administration web application web.config
file
Open Central Administration web application web.config file and
add the below entries.
- Go to Start => Run => inetmgr.
- Go to Sites => SharePoint Central Adminstration=> Right Click
=> Explore.
- Open the web.config file.
- Add the Following
<connectionStrings>
<add name="AspNetSqlProvider"
connectionString="Data Source=hvdatabase;Initial Catalog=FBA_Users;Persist
Security Info=True;User ID=sa;Password=Hexacorp123;"
providerName="System.Data.SqlClient"
/>
</connectionStrings>
</connectionStrings>
<system.web>
<membership defaultProvider="FBAMembership">
<providers>
<add name="FBAMembership" connectionStringName="AspNetSqlProvider"
applicationName ="/" type="System.Web.Security.SqlMembershipProvider, System.Web,
Version=2.0.0.0, Culture=neutral,
PublicKeyToken=b03f5f7f11d50a3a" />
</providers>
</membership>
<roleManager enabled="true" defaultProvider="FBARoles">
<providers>
<add name="FBARoles"
connectionStringName="AspNetSqlProvider"
applicationName="/"
type="System.Web.Security.SqlRoleProvider, System.Web,
Version=2.0.0.0, Culture=neutral, PublicKeyToken=b03f5f7f11d50a3a" />
</providers>
</roleManager>
</system.web>
3. Configuring Security Token Service web.config file
Open Security Token service web.config
file and add the below entries
- Go to Start => Run => inetmgr.
- Go to Sites => SharePoint Web Services
=>Security TokenServiceApplication => Right Click => Explore.
- Open the web.config file.
<connectionStrings>
<add name="AspNetSqlProvider"
connectionString="Data Source=hvdatabase;Initial Catalog=FBA_Users;Persist
Security Info=True;User ID=sa;Password=Hexacorp123;"
providerName="System.Data.SqlClient"
/>
</connectionStrings>
</connectionStrings>
<system.web>
<membership defaultProvider="FBAMembership">
<providers>
<add name="FBAMembership" connectionStringName="AspNetSqlProvider"
applicationName ="/" type="System.Web.Security.SqlMembershipProvider, System.Web,
Version=2.0.0.0, Culture=neutral,
PublicKeyToken=b03f5f7f11d50a3a" />
</providers>
</membership>
<roleManager enabled="true" defaultProvider="FBARoles">
<providers>
<add name="FBARoles"
connectionStringName="AspNetSqlProvider"
applicationName="/"
type="System.Web.Security.SqlRoleProvider, System.Web,
Version=2.0.0.0, Culture=neutral, PublicKeyToken=b03f5f7f11d50a3a" />
</providers>
</roleManager>
</system.web>
D) Adding User Policy to the FBA Web
Application
Follow the below steps to add user policy to the web application.
a.
Go to
Central Administration ->Manage Web Applications -> Select the FBA web
application and click on ‘User Policy’ option in the ribbon.

b.
Click on ‘Add Users’ link and select ‘Default’ as the zone
and click on ‘Next’ button.


c.
Type the user name created in ‘Create User’ section in the
‘Users’ textbox and click on people picker icon. You should see the user name
get underlined in the ‘Users’ textbox.

d.
Follow the verification steps to test form based
authentication.
E) Verification Steps
1. Go to FBA SharePoint site and select ‘Forms
Authentication’ option.

2. Enter User Name and Password and select ‘Sign In’ button.

3. You should be redirected to home page.

For Clarification Contact me : sugumaran.krs@gmail.com
No comments:
Post a Comment